Thursday, June 13, 2019

Just a Little Note...


I really love a bright white card with a splash of intense color! That's what today's Stamp Simply project is.  Loving our new floral cluster series, and how cool it is that one die fits all four stamps?!

For today's card, I used Copic markers and clear Wink of Stella to color the lovely Spring Pansies, then set the diecut floral atop a circle diecut from Prima Fruit Paradise 6x6.  The sentiment, heat embossed in white on a black banner strip, gives some great contrast against the orange underneath.  There are just a few jewels scattered throughout for some sparkle.   


And inside, how appropriate that the Fruit Paradise paper design features a flower and garden seeds vintage advertisement!  I just LOVE old fonts and calligraphy.  

Supplies:

Thursday, June 6, 2019

On Your Wedding Day!


All of us at Stamp Simply are excited to be sharing a fantastic new release!  Please join us as we share our new Floral Clusters series which includes seasonal florals and one matching die set that works for all four stamp sets.


These beautiful stamps cover all kinds of sentiments and occasions...my card for today celebrates a Summer wedding.


I've always loved baskets, but especially since I took basket weaving classes way back when we were first married and living in Hawaii.  When I first saw this basketweave print and the lace print, too, I knew I had to make a basket card...our new floral cluster stamps series and matching dies provided the perfect opportunity!  


I used a Curved Matting Basics B die to cut the basket, inking the edges with tea-dye distress ink, then fussy-cut the scalloped lace paper to fit the top of the basket.  The handle, another die from Curved Matting Basics B, was attached with a copper brad.  The Summer Roses were stamped and colored with pale pink and warm grey Copic markers, then die cut and accented with clear Wink of Stella and clear rhinestones.


There are three leaf dies in the Floral Cluster die set.  I used two of them to cut leaves from the pale green paper, then glued them back-to-back, bending and shaping them to make a simple dimensional accent for the sentiment banner.  The paper was printed on a single side, so this not only covered the blank side, but strengthened the delicate stem as well.  I love how it turned out!


There is more of the lovely rose print on the inside, along with a partially stamped sentiment from another of the sentiment stamps in the Summer Roses stamp set.  

Supplies:

If you haven't visited the Stamp Simply blog lately, you really should!  You will not only be able to see all of the wonderful samples our team has made to showcase the beauty of this release, but you can help us welcome our new design team member, Jill!


We are thrilled to have Jill join our team!  

Thursday, May 30, 2019

He will never leave nor forsake us!


I thought I'd try something a little different for today's Stamp Simply project! The long narrow design of this sheet of designer paper said "bookmark" to me, so I made one that slides on/off underneath the edge of the card front, held on by the loops of its cording. Even when the bookmark is removed, the card is still cute!


I put dimensional adhesive under only the bird print part of the design so that there was open space for the folded bookmark to slide underneath...with the cording wrapped around the back of the top-folding card front and the bookmark, it stays fairly securely in place. The card itself is 4 1/4 x 5 1/2, so with the bookmark in place it will need a bit larger of an envelope.


I chose to repeat the same passage of scripture that's on the bookmark on the inside of the card since this particular passage is repeated over and over in the book of Joshua...obviously we need lots of reminding to be strong and courageous!


Here is a peek at the inside of the bookmark. This paper is so fun!

Here are the supplies for today's project:

Thursday, May 23, 2019

Wrapped in Prayer


Sadly, I needed another sympathy card, and wanted it to not be a very somber one...hopefully this is colorful and yet motherly/lady-like without being disrespectful.  


The layout was inspired by this week's Freshly Made Sketch and my friend Judy's card.  My initial plan was to keep this rather clean and simple and flat for mailing, but then I couldn't resist adding that beautiful cross, even though it pained me to cover up the pretty seed packet!  LOVE this paper!


I enjoy making window cards where there's a peek of the inside from through the window, but then the reveal of more once the card is opened.  These are such beautiful sentiments.  

Supplies, all from Stamp Simply:

Thursday, May 16, 2019

Stars & Stripes Forever!


I just LOVE this polka dot paper!  A few weeks ago when I made another patriotic card I used the negative space from the dies and had these partial stars left over.  Since Memorial Day is fast approaching, I decided that I should use them for another Americana card and today's Stamp Simply project.    


It's sorta fun to mix and match papers from different pads and companies, and that's what I did here.  The mat of blue card stock under the focal point stars is actually made using a die cut.  

The kraft card base is sort of an ode to the beach, since  many consider Memorial Day the official kick-off of Summer and so many Floridians head to the shore for the holiday.  


Here's the inside...simple with that bright pop of patriotic color.  I very nearly stamped a thinking of you or sympathy sentiment, because remembering loved ones lost in service to our nation is what Memorial Day is truly all about.  Three servicemen lost their lives over the span of the nearly 29 years that my husband served in the Navy, and each Memorial Day we remember them and their families.    

Supplies:

Thursday, May 9, 2019

The Righteous Man


I love making clean and simple masculine cards, because it seems that CAS is what my guys (my husband, son and brothers) appreciate most.  

The designer papers for today's Stamp Simply project made me think of pinstriped shirts and men's silk ties.  I got a glimpse of the passage "As for me and my house" when I was pulling out this Proverbs verse, so the houses print had to make an appearance as well.  


I cut two strips of the striped paper, lined up the stripes "right sides together" like fabric and then cut diagonally to produce a matched, mitered corner.  


The inside has the Father's Day greeting from All Occasions 2, along with a fussy cut house to add just another little detail and to carry the Father's Day/family theme throughout.  

No frills, no fuss.  They'll let me get away with a bow though, since it is one with a shirt button tied to it!  ;)  

Supplies:

Thursday, May 2, 2019

Congratulations! Great Job!


This week I've been spending my evenings at our local community theater as my son and his fellow cast-mates have been  working to put the finishing touches on their production of Little Women. Another Debbie and I have been frantically working to clothe them all scene-by-scene in somewhat period-correct clothing borrowed from my reenactment friends and from other local community theaters.  We've been altering, mending, and sewing for several weeks and thankfully everything is finally coming together right on time for our Thursday evening soft opening.

I'm SO proud of all the work that's been put into this production, and even though it's "just" been rehearsal, several of the songs and scenes have already moved me to tears!  This cast has been hitting it out of the ballpark.  ❤️  That's why I was inspired to create a "Little Women" congratulations/good job card for today's Stamp Simply project.  I love how this paper and these two stamp sets have worked so well together to create a card so perfect for this occasion.


This was a really simple card to put together because the focal points are such vibrantly colorful, beautiful little vignettes and quotes that look great just as they are.  A little matting and a few simple embellishments are really all you need to make a simple but elegant card.  


Here's the inside.  I just HAD to use this quote, because over and over throughout both acts, through music and lines, Jo tells of her plans to "astonish you all someday."  I have been astonished by the generosity of my friends and the talent and dedication of this cast and crew.  They are amazing!  

I'm SO grateful that the play will be running for two consecutive weekends!  Since I am leaving this morning for the 1860s Civilian Celebration in Capon Springs, WV on a trip that was planned well before the play was on the calendar, I will miss all four performances of opening weekend.  Thankfully there will be several more performances over Mother's Day weekend, so I will get to see it after all.  

Here are the supplies I've used for today's Stamp Simply project:

Thursday, April 25, 2019

Proud to be an American!


I feel so proud (and blessed!) to be American.  My husband spent nearly 30 years in the USN, and the city in which we live is very much a "Navy town."  Memorial Day, celebrated on May 27,  is our next patriotic holiday, but truthfully, every day is a good day to show your gratitude to a veteran, and around here we have plenty of opportunities!  


I love how the Stars 5 dies look when they're scored and folded 3D!  Scoring from the point to the "notch" all the way around and then giving the folds an alternating mountain/valley orientation and a little pinch creates that dimensional effect.  Then when they're glued into a negative space cut using the same die, there's a little border that really helps them to stand out even more.  

The angle of the fishtail banners is a perfect fit, too!  I cut the sentiment banner, then ran it through the machine again to create more of an arrow shape that nestles perfectly into the edge of that star.    


Here's the inside.  My stamping platform was really helpful in getting nice color saturation on those stars, and clear impressions on the sentiments.  

Here are the supplies I used for today's Stamp Simply project:

Thursday, April 18, 2019

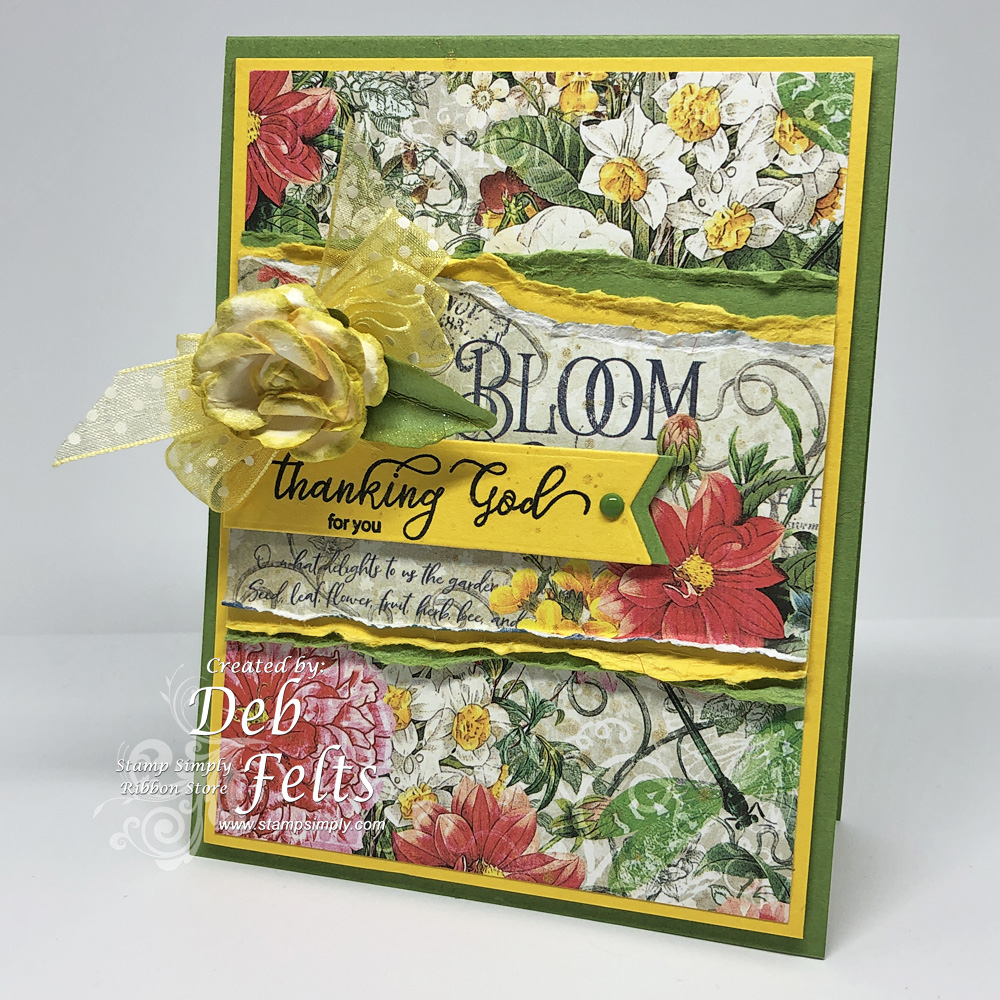
Thanking God for You!


Everything has been so beautifully green and gorgeous lately!  Yes, it's already hotter than blazes in Florida, especially when you're dressed for the 1860s as my friends and I have been for the last two weekends, but the hotter, summer-like days are interspersed with cooler, more pleasant Spring weather that is quite pleasant.   

Time is certainly flying by!  Easter is almost here, and Mother's Day is just a month behind it.  My calendar is filled for the next four weeks, so I'm trying to stay with my head above water.  For today's Stamp Simply project, I made a Mother's Day card for my husband to give his mom.  There's not a day that goes by that I don't miss my mom, and I am so thankful for my mother-in-law!   


I wanted this card to be bright and sunshiny, so I used the beautiful Graphic 45 Flutter designer paper with some bold green and yellow card stock.  


Using my mom's paintbrush to splatter things just makes me happy!  I love the bit of glitz that Delicata gold brings to this project.  It's also kinda cool that the font of the stamp set harmonizes so well with the font from the designer paper.  I always feel that I have to be so strategic with Graphic 45 paper, because it is too lovely to cover up and I don't want to waste a bit of it!

Supplies:

Thursday, April 11, 2019

You're in my Thoughts!


A friend from back home lost his mother recently, so today's Stamp Simply card is a relatively flat-for-mailing sympathy card.  This paper is so beautiful that it really doesn't need much embellishing at all but I couldn't help but add those big ole pearls, so I may need to try to pad the envelope a bit after all.


As I have mentioned before, I often put butterflies on sympathy cards.  This one started with a small but wide rectangular piece of white tulle that I stretched, fraying the edges, then tying them into a small bow.  This was topped by double bow of jute string and a pearl.  


I love that these sentiments are so simply lovely and yet so versatile.  This pairing of sentiments would work for a variety of occasions.  

This card was splashed both inside and out with diluted Delicate silvery shimmer ink.  It just adds a bit of shine, sparkle and elegance to the paper, which has its own classic vintage feel.  I love it!  

Stamp Simply products used for today's project: