Thursday, November 29, 2018

It's Beginning to Look A Lot Like Christmas!


Hi everyone!  Are you starting to feel the Christmas spirit?  I usually struggle to get into it but once Thanksgiving has passed, especially if the temperatures plummet as they have in the last day or two (I'm sitting before a warm, crackling fire as I type) and the neighbors begin putting up their Christmas lights, the enthusiasm is contagious.  I adore this season and always wish that it lasted longer than a single month.  Every year I vow to do my best to savor it, but it always seems to just fly by.

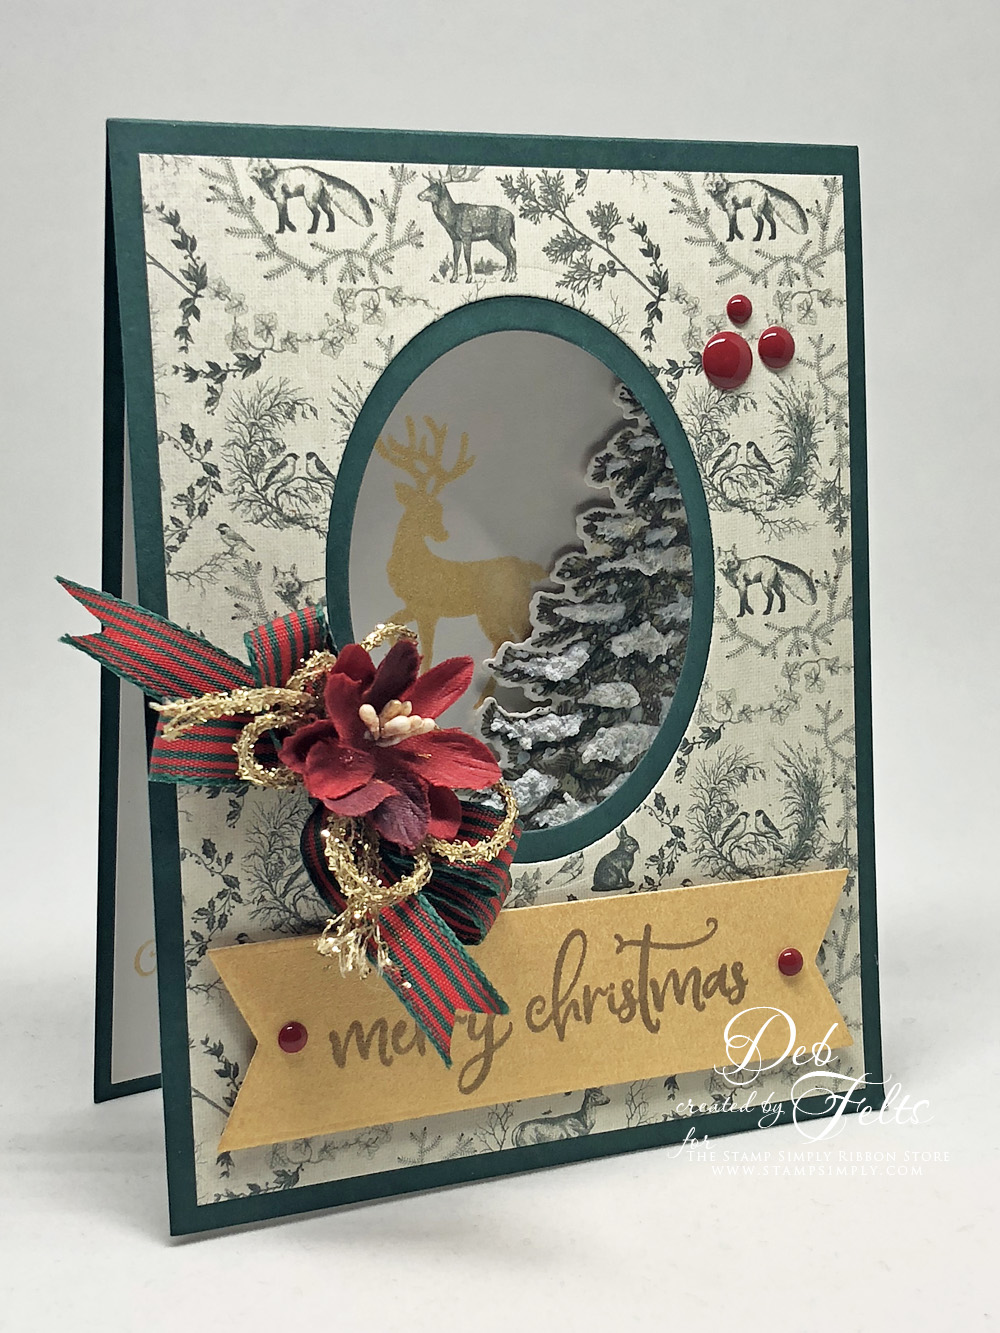
My Stamp Simply project for today is a quick CAS card that lets sparkly designer paper, punch-outs and metallic ink speak for themselves.  Although it does have popped up elements on the front and a trio of tiny pearls on the inside, it is still relatively flat for mailing.  


The focal point is a holly leaf colored with Copic markers and Wink of Stella pens.  The sparkle of the Wink of Stella helps to unify the leaf and the glittery designer paper background.


The inside could just as easily be the outside of another CAS card! I used one of the boughs from A Godly Man to stamp a Christmas tree bough decorated with a few gold baubles.  Here too, there is the sparkle and softness of clear Wink of Stella and gold Delicata ink.

Here are the supplies used for today's project:
I'll be saying farewell to November Friday night with a ukulele workshop, then welcoming December with a celebration of Colonial Nightwatch Saturday evening in St. Augustine, and a community Advent service closer to home on Sunday evening.  Hopefully there **might** be some time to get a little decorating done in between!  

Thursday, November 22, 2018

Happy Thanksgiving! Christmas is coming!


Happy Thanksgiving to all of you who are celebrating today!  I am so thankful for my family and friends, for each special relationship and for the time we share together.  I'm grateful every single day, but I'm glad that Thanksgiving and Christmas give us the opportunity to celebrate each person in an extra special way.


I know some of you are probably finished with your Christmas shopping by now, but in our household Thanksgiving Day heralds the real beginning of the Christmas season, when the list-making gets into high gear!  My Stamp Simply project for today is a little decorated notepad to keep all of those Christmas lists in one place.


I like using an electronic calendar, but I still really like thinking things through on paper...I enjoy using something that is not too precious but still a little more special than a sheet of scratch paper, something that looks cute instead of adding clutter to a landscape that is already filled to the brim with decorations and sentimentals.  


I don't want my cute list keeper to be disposable, though!  I want to be able to change the tablet when I run out of paper, and I'd like to re-use the cover and start fresh each year, so instead of gluing a notepad to the back cover, I made the project with a slot to slide a fresh pad in when the time comes.  It's just another sheet of card stock with part of an oval die cut into the top, glued into the back cover only on the sides and bottom.  


If you have ever made a slot like this, you know that they're pretty tight and require extra width in order for a tablet to fit easily. Rather than adding extra dimension to the entire notepad, I opted to adhere a piece of narrower card board (from the inside of a bias tape package) to the back of the notepad so my cute little project doesn't take up much real estate on my coffee table.  A small piece of  gold mirror card stock also covers the not-so-cute office supply store label at the top of the pad, so the inside is pretty too.  I'm debating going back to add a pocket of a coordinating designer paper to the inside front so I can stash loose papers/receipts and maybe even a pencil.  

Here are the supplies I used for today's project:

Thursday, November 15, 2018

Another Window Card


Hi everyone!  A few weeks ago one of my readers asked for instructions on making a window card so I'm back with another one, this time with traditional Christmas colors and imagery.  These are really simple to make, and can be left simple or fancied up depending on the occasion.  They are also a good way to create an interesting yet relatively flat card for mailing when made without bows, flowers, enamel dots and other bulky embellishments.


This card starts with a standard 8 1/2 x 11 inch piece of card stock cut in half vertically and folded to create a 4 1/4 x 5 1/2 inch card front.  

The window, using the larger of two coordinating dies, is first cut into a 4 x 5 1/4 inch piece of designer paper.  After adhering the designer paper to the card front, it is easy to then position the smaller die within the negative space and run the open card back through the die machine to make the actual opening that allows the inside of the card to peek through.  What a fun "teaser."

Adhere another piece of 4 x 5 1/4 inch card stock to the inside, close the card, and stamp the image or quote to properly position it within the window.  It helps, especially with solid stamps, to use a platform so that the stamp can be repetitively inked and stamped to get adequate coverage.  One advantage of the Tim Holtz platform is that one of its edges is open...even if you've already completed your card front, you can position it off of the edge of the platform to stamp the inside.


Here's a full view of what is peeking through from the inside.  I included a die cut tree and sentiment, which adds a bit more dimension and interest for both the "peek" and the full reveal, especially with shimmery ink and some textural snow.

Today's version of the window card uses coordinating dies and the contrasting colors of the designer paper and card stock to create a simple border.  Another option as seen here, is to die cut a fancy die shape, and then use a smaller basic shaped die (the same size as the one used to cut the actual opening on the card front) in its center.  This creates an actual frame that can be layered directly onto the card front, with a stamped image or designer paper tag peeking through.  It's especially fun because in this case the window design is not quite as obvious until the moment the card is opened.

I hope you have fun playing around with coordinating dies in graduated sizes and varying shapes to make some window cards of your own.

Here's what I used for today's card, all from Stamp Simply:

Thursday, November 8, 2018

Time for a Cup!


I absolutely adore Authentique's new Jingle designer paper!  Just look how darling this vintage image is!  As I flipped through the pad and came across this image and the cute coffee cup paper, it made me think of stopping in the midst of a Christmas shopping spree for a cup of hot coffee with a friend and a rest from the frenzy!  And so...I just had to make a k-cup holder for today's Stamp Simply project.


There are a lot of different designs for k-cup holders on YouTube. Here's a tutorial for how this particular one is made.  These go together really quickly when you use dies, quick solid stamps that do not require coloring, and printed tags/images.


All of the supplies I used are listed here:

Thursday, November 1, 2018

Celebrate Fall!


Between my recent foray into historical fashion and Halloween this week, it seems like Life has centered around costuming, so I could not resist this "not quite Little Red Riding Hood" image for today's Stamp Simply card.  I love the soft misty greens of the printed image and tried to incorporate the colors and haziness into the background of my card using distress oxides and splashes of glittery Delicata ink.


The flurry of leaves surrounding the girl inspired the addition of a few stamped, Copic colored die cut leaves as accents to carry the theme further.


The inside is simple, with a bronze wheat sheaf and the script from our newest Autumn stamp set.  I love how well our older sets coordinate with the newer ones to give even more versatility.

Here are the supplies: