Thursday, February 7, 2019

Strawberry Season


Today's Stamp Simply card looks like a Valentine and very well could be, but the local Strawberry Festival just a month away is what actually inspired it. I was flipping through a paper pad and came across this cute strawberry print.  Mmmm, I love strawberries!  They're my favorite!  Inspiration, and (I found out later) an OOPSIE...the sheet was actually tucked into the wrong paper pad.  It's Authentique, just not from the Authentique pad I thought.  ðŸ˜³  This one is retired.

 
I loved the look of this particular color of green seam binding against the vines in the paper, but didn't have the right color of green card stock to match.  No problem!  I die cut a few leaves from white card stock, colored them with a Copic marker and used the leaf die to "stencil" the veins/markings with distress ink.  With that beautiful seam binding, some jute thread and Petaloo mini blossoms, the leaves provide a focal point on the card front and bring a pop of color to the inside as well.


I had only this one piece of card stock in perfectly matching dark red.  Not even another single scrap for that little tiny heart...so I die cut the heart from one corner to use on the front of the card, then folded the card stock so that the opening was on the back/inside.  I glued a strip of the strawberries designer paper to the back of the card so that it peeks through the heart-shaped opening, adding a stamped/embossed sentiment, a couple more leaves and some enamel dots.  A cute solution that solved another card stock shortage problem.   I really need to make a card stock order soon!

Supplies:
I can hardly wait to show you the rest of the cards that came from this stamping session and the next! I had two productive afternoons in the studio.  Be sure to come back next week to see them!  ☺️

Thursday, January 31, 2019

Garden Goddess Valentine


January has flown by and Valentine's Day is just a couple of weeks away.  Today's card is a romantic Valentine using Graphic 45's Garden Goddess designer paper and a couple of stamp sets from Stamp Simply's Farmhouse series.  Hopefully you're reminded of love notes and postage-stamped envelopes when you look at it.    


I glued one of the printed papers onto the card front before die-cutting the heart-shaped window to allow the beautiful image to peek through.  Some gold Wink of Stella around the edges of the heart makes it look more finished and elegant, especially when embellished with some sheer ribbon, wispy tulle, die-cut leaves and a rose also edged in shimmery gold.  The rows of "postage stamps" are cut from another sheet of designer paper printed with various border designs.  (This double-sided paper pad is packed with lovely options!) 


The entire ~ 2.5 x 4 inch image is visible once the card is opened, with a little fishtail banner sentiment along the right side to add some extra interest.  The layers of green and white underneath really make the printed image pop.  Super simple to put together.

Supplies:

Thursday, January 24, 2019

Every Good and Perfect Gift


Hi everyone!  I'm here today with another quick Stamp Simply card that could easily be adapted for numerous occasions.  Black, white and gold are so elegant!  This color combo would work for just about anything (and interestingly enough, here I'm getting some extra mileage from paper that is part of a Christmas pad...if you're one of those organized people who stamps Christmas cards all year round, with this pad you'll be ready to start early!)


I love this foil paper!  I used square dies in graduated sizes to cut out the gift and the opening for it in the outer layer of designer paper with the foil from underneath peeking through.  Quick and easy peasy!

There must've been some residual Versamark on my sentiment stamp because when I stamped it onto the foil paper it lifted some of the foil.  If it had been a bit juicier I would have straight-away embossed it with black embossing powder, but I decided to stamp it again with some black soot distress oxide ink which was more quickly within reach.


The inside uses what's left of the punch-out scallop border with a fussy cut gift and a sentiment from Farmhouse Scriptural Quotes stamped with Memento ink.  

Here are links to all of the supplies I used:

Thursday, January 17, 2019

Classic Plaid Shirt


Since I've made a few girlie dress cards for the ladies I thought it only right that the gentlemen have their turn, so with my scor pal and sewing machine I came up with a very CAS classic plaid shirt. Originally I thought that I might try to dress it up with a pocket or a bow tie, but my guys voted for the "less is more" version, so here it is.


Stamp Simply's set, A Godly Man, is the perfect set for a card like this!  The antlers, stamped and embossed in silver, mimic the brand logo so often seen on men's shirts, with wood dots for buttons.  


Inside, a quote from scripture that would work for Valentine's Day or any day.  

Supplies, all from Stamp Simply:

Thursday, January 10, 2019

Fishtail Banner Card


Hello again, friends!  Happy Thursday!

I saw a card similar to this one while browsing Pinterest a while back and decided to make one using our Stamp Simply fishtail banner dies.  It's another fun way to combine lots of pretty designer prints, even for a masculine card.  I gathered a handful of coordinating papers, die-cut a bunch of banners in different sizes, and then arranged them all on a 4 x 5 1/2 inch piece of white card stock.  Once I had them all glued in place I trimmed each of the edges and glued it to a piece of contrasting card stock for an easy card base.


From this angle (upside down from top right to bottom left) you can see where two of the banner ends meet to form the perfect little spot for an enamel dot (or jewel) accent.  

The sentiment is stamped inside another fishtail banner.  Our All Occasions Sentiment Set 2 has several sentiments that fit perfectly within the die which comes in various sizes, so this would be an easy card to duplicate for other occasions.  I think my quilting friends will really appreciate this design!


Here are the supplies I used to make today's project:

Thursday, January 3, 2019

Seeds of Kindness


Happy New Year!  I hope that you had a wonderful holiday!  We put our Christmas tree up late and so we'll continue to enjoy it through Epiphany.  Even so, slowly but surely, things are beginning to return to a more normal routine.   

Many of  my friends posted New Year's greetings or resolutions to social media where happiness, kindness and gratitude were recurring themes.  I love the quote on this beautiful Graphic 45 designer paper and thought it was appropriate for my first Stamp Simply project of this new year.


This sentiment is from our masculine set, A Godly Man, but it's just as perfectly at home on this frilly, feminine card with accents of Living Coral ribbon, flowers, and wispy white tulle.   


For the inside there's a fishtail banner die-cut from that gorgeous paper along with a faint (stamped off) sunflower from our Sunflower Season set as a background for another sentiment.

Supplies:

Thursday, December 27, 2018

Exotic Little Black Dress


Well!  I hope y'all aren't gonna think I'm really weird or something! One just never knows from where inspiration is gonna strike! When I first saw these two particular prints in Graphic 45's Flutter designer paper, I immediately thought of Victorian "beetle wing" dresses.  They were, at one time, all the high fashion rage and they're stunningly gorgeous in an exotic, odd way.  Here is a link to one and a little history, since it is possible or maybe even likely that you've never seen or even heard of the Victorian version, although you might have seen beetle wings in Egyptian fashion and art.  


Then I came across this easy origami video for folding a cute little dress!  I used a scor-pal for some of the folds of mine since this paper is a little thicker than traditional origami paper.  A little bit of sponging with Black Soot distress ink helped to add the illusion of even more dimension to the folds and edges of the dress, and also helped the bright yellow paper underneath to recede into the background instead of being so boldly prominent.  The camera didn't really pick up the added sparkle of the clear Wink of Stella that I added to the beetle wings of the dress, but IRL it is readily visible.

I used a fishtail banner die to cut the stamped sentiment into two separate pieces to dangle from the ribbon "belt" and added a little sparkle there too with the Wink of Stella markers.  With a change of sentiments inside and out this would make a fun birthday card, something for bridal, prom or girls' night out.


I just love the dimension of the folds of the skirt and how 3-D it sits on the front of the card, and how appropriate is it that there is a peek of beetle wing in the background paper right at the hemline!?! 


The paper (and sponging) that I used on the card front was repeated on the inside along with a favorite scripture.

I suppose a card and a post like this shows how completely enthralled with Victorian fashion I have become!  For much of this year I was immersed in research for one period or another, grateful for knowledgeable friends to show me the ropes in the reenacting world.  They would totally comprehend and appreciate the strange inspiration for today's project!  I know exactly to whom I should send this card!  ❤️
All of the supplies used for today's card are from Stamp Simply:

Thursday, December 20, 2018

The Rose of Sharon


Today's Stamp Simply card features an everyday stamp set with a Christmas set in a clean and simple card design.  I'm really pleased with the way it turned out, quite simple and yet still elegant.


The rose was stamped with Memento ink, then colored with Copic markers and highlighted with a white Prismacolor pencil.  All of the card stock edges were distressed with tea dye distress ink.  I wanted wood dots that were a little greener blue than what was in the package, so I colored the natural wood ones with a Copic marker.  


Inside there is just a hint of Winter designer paper, two prints from Authentique's Solitude.


The "rose" sentiment inside was stamped with shimmering Celestial Copper Delicata ink onto the dark card stock, then die-cut and mounted on top of the designer papers with dimensional adhesive.

Supplies:

Thursday, December 13, 2018

Holly Jolly Envelope Project


Hello friends!  I'm here with another easy peasy fun project for Stamp Simply using kraft card stock, a few stamps and dies, and some lovely Graphic 45 designer paper!


I started with an 8 1/4 x 7 piece of card stock.  With the 7 inch side along the top of the Score-Pal, score at 1/2 and 3 3/4 inches.  Add scor-tape along the 1/2 inch flap, and along the top and bottom of the inside of the adjacent section as shown in the photo.


Create a flap using Spellbinders' classic circle dies.  To make it, die cut a circle that is approximately 3 1/4 inches in diameter.  Fold it in half, then score 1/4 inch on either side of the score line before cutting the flap in half (save the other half for envelope #2!). Because my kraft card stock was rather thin and I love layers, I chose to add a smaller half-circle of contrasting card stock with a strip of designer paper to accent.  

I used the smallest circle die and a 1/2 inch circle punch to create the tabs for the closure.  I used a crop-a-dile to place an eyelet in the center of the unglued circles, then glued them to the flap in the desired placement.  Leaving the layers unglued will give the string a place to easily lace to hold the flap closed.  Adhere the flap to the inside top of the envelope, then fold and adhere the bottom and side to create the envelope.


Add designer paper if desired, then add a corresponding eyelet circles to the envelope to complete the closure.  


I also chose to punch three holes in the side of my project so that I can add more pages and make them into a little book.  Punching the holes into the side that was taped to close the envelope adds an extra layer to provide a little reinforcement so that hopefully the holes will not rip out quite as easily.


The leaf was stamped with Memento ink, colored with Copic markers, then given a bit of sparkle with clear Wink of Stella.  It harmonizes beautifully with the designer paper tag from the 8 x 8 paper pad, especially with the added splash of a little gold Delicata ink and a few pretty pearls.


A little burlap string holds the flap closed, with a couple of sparkly tags dangling from it.  

This project can stand alone as is, but would also be beautiful as an embellishment for a gift box or bag.  It is perfect for enclosing a personal letter, gift card, or small trinket.  

Here are the supplies I used:

Thursday, December 6, 2018

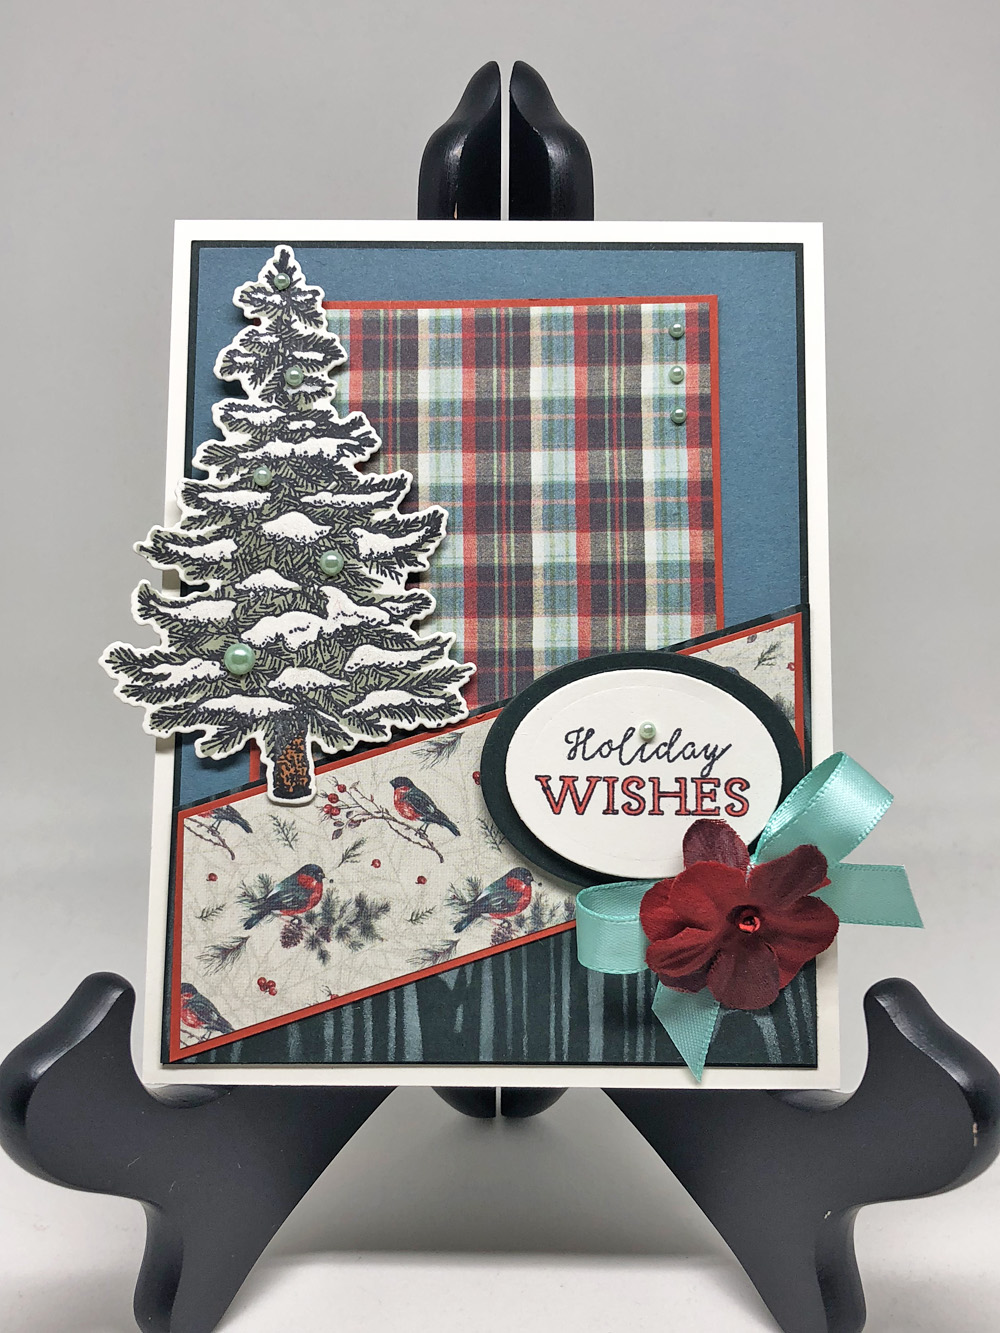
Holiday Wishes


Hi everyone!  Happy December!  

For today's Stamp Simply project, I couldn't resist adding some pearls, a bow and blossom to what started out as a masculine card inspired by this awesome plaid designer paper.  The bird print and the woodgrain stencil both add to its woodsy feel, and although it is in Christmas-y colors, with this sentiment and a change of designer paper it could easily be adapted for other Winter holidays/occasions.


This is a flat, unfolded pocket card.  One could attach a gift card to the back of the pocket insert if desired.


If you look closely, you might be able to see a little of the sparkle of clear Wink of Stella on the snowy branches of the tree...very difficult to try to capture on camera and much prettier IRL.

Supplies: