Thursday, April 30, 2009

DRS Blog Hop

I'm so excited that today is my first DRS Designs Blog Hop! This is the *official* unveiling for Dawn Mercedes and me as guest designers for the months of May and June! We have already been having lots of fun, and I'm beyond thrilled to be on this team of talented designers! I know I am going to learn alot and grow some wonderful friendships.

If you are just jumping on the blog hop, you should go to the DRS Blog so that you can start at the beginning! You don't want to miss the great ideas and fun sneak peeks that all of our stampers have to show you.

My card for today is a tri-fold card featuring a cute monkey, E871. I stamped him using Memento Tuxedo Black ink on white cardstock, then colored him with prismas and gamsol, layering the colors to bring more intensity to the darker areas and to tint his cheeks, lips, and belly. I stamped him once more, just to color and cut out part of his face to add dimension and depth.

To make the card, I cut a 3.5 x 10.5 inch piece of cardstock. Then I scored 3.5 inches from each end. I made diagonal scores on the front and back flaps (see the picture of the open card to figure out how to orient these score lines). I added triangular pieces of DCWV designer paper inked with Tim Holtz distress ink and matted with coordinating cardstock. After adhering the ribbon to the left card flap, I then added some circles (I miss my nesties!), only adhering the top left side, attaching the monkey on top with dimensionals. The rest must remain free so that the card can swing open freely. After punching a scalloped circle from cardstock, I snipped the *petals* toward the center, wrapping each gently around a toothpick to create a curved shape. A paper flower and button tied with cord finish the embellishments on the card front.

For the inside, I cut more triangles of coordinating designer paper, along with a 3.25 inch square of ivory cardstock. I inked all the edges, stamped the sentiment, and adhered them to the card base. I used a marker to sketch a fun border (also on the circles on the card front), then added a second monkey with dimensionals to the bottom corner.

If you started at the beginning, you've got one more stop and then you're done! My friend Vicki has a fabulous design to share with you, so don't miss it! I hope you've had fun!

Blessings!

i {heart} papers hail and farewell!

It is both a sad and exciting day for our i {heart} papers design team. We are bidding a fond farewell to two members of our inaugural design team, Kendra Wietstock and Sarah Anderson. They are absolutely amazing stampers, with abundant amazing creativity and personality plus! We are going to miss them tremendously!

The rest of us have the wonderful good fortune to welcome the fabulous Lynn Mercurio to our team! Lynn is of SCS fame as she hosts the popular Technique Lover's Challenges on Mondays. Her most recent *hat* to wear is that of editor-in-chief of Stamp TV's Stamping Lifestyles online magazine. Lynn has been part of our team behind the scenes for a while now, so we are excited to finally publicly welcome her and look forward to seeing what she will do with the great products that are available in the ihp online store.

The card I'm sharing with you today is from yesterday's SCS Sketch Challenge. It features the fun Just Bugz set from ihp (by Our Craft Lounge). I stamped the bee on white cardstock, colored it with Copic markers, glitzed its wings up with clear Spica glitter. I used a scrap of BoBunny's designer paper edge punched with a Martha Stewart punch for the horizontal panel, and yellow Bazill cardstock as an accent. The bee was placed on dimensionals atop several layers of punched circles. A little *Faith-dot* border around the edges, and a bow of black and yellow gingham pulled the design together.

Make sure to take a look at the other ihp designers' blogs as they farewell Kendra and Sarah and welcome Lynn! At i {heart} papers Kate is offering a 10% discount on all purchases starting today and running only through this Saturday, May 2nd, so the time to shop is NOW! The discount code for this discount is HGB10 (HGB is short for Hello & Good-Bye).

Wednesday, April 29, 2009

Sweet 'n Sassy Blog Hop and Color Dare #14!

There's alot happening on my blog today! It's the beginning of Sweet 'n Sassy's blog hop, and also Color Dare #14. I decided to combine the two for one fun card, and I am hoping you'll like what I've come up with!

Today's Color Dare colors are Baja Breeze, Not Quite Navy, and Riding Hood Red. When I saw these colors together, I immediately thought of my family's long-standing love for the Ole Miss Rebels. My mom grew up near Oxford, my dad went to school at Ole Miss, and my brother also attended there for a while. A lot of my relatives worked there, and many still live in the Oxford area.

This hat and sentiment are from Sweet 'n Sassy Stamps set, Cool Dude. I stamped three hats on a strip of watercolor paper using Stazon ink, then stamped three more on another scrap. I used an aquapainter to lay down a wash of Baja Breeze for the background. I laid in the cap colors in several layers to gradually intensify the color, then cut them out and adhered them with dimensionals. I accented the panel with a row of piercing along the horizontal edges, then matted it with Riding Hood Red and Not Quite Navy, distressing the edges just a bit.

For the sentiment, I stamped the phrase in Baja Breeze on a scrap of the same colored paper, then matted it with Not Quite Navy. I cut a square of Riding Hood Red, then sliced it from corner to corner to make four small triangles, attaching two to the sentiment with brads and reserving two for a future project.

I love how clear and bright these colors are, and I am pleased that while this card is clean-lined and masculine, it isn't boring! My uncle would love it!

Be sure to visit my Color Dare design team mates' blogs to see their always fabulous creations, and then return here to jump on the Sweet 'n Sassy blog hop! All the links are on the sidebar on the right. Have fun!

Tuesday, April 28, 2009

DRS Cutie Pie!

I was so excited to find this Cutie Pie in the package of stamps that DRS Designs sent me! I think she is so absolutely adorable! I have been trying different coloring media to see how she looks with each one. She's so much fun to color!

Last week Asela and I shared lunch and then stamped together for a while...Asela didn't get much done since she essentially ended up pausing here and there to give me my own little private copic lesson! I enjoyed it so much, and built quite a bit on what I had already learned at the Copic certification course I took in February. It was fun to use Copic colors that are not yet part of my collection, and to see how the various colors blend together to create high- and low-lights to give a two-dimensional image more of a 3-D appearance.

For this card, I stamped using Memento ink, then colored with Copic markers to match BoBunny's designer paper Alissa Twirls. I added a black mat with a lacy edge because it seemed to really heighten and brighten the colors, especially with some hot pink BoBunny button accents and a bow of mint glimmer ribbon.

I think she is going to be one of my very FAV stamps during my two months as DRS guest designer! I just love her!

If you liked the sweet silhouette I posted yesterday, you should go visit my friend and DRS Roomie Dawn Mercedes! She posted the companion silhouette, a little boy, using a mosaic stamp which turned out absolutely gorgeous! I'm so happy to be guest designing alongside her! I think she's amazing!

Monday, April 27, 2009

Silhouette

Before I left for my parents' in Louisiana I spent some time stamping with my new DRS images. Today I'm giving you a little sneak peek at a sweet silhouette prayer image soon to be released (F931).

I knew when I first saw this stamp that I wanted to make a black and white card with just a hint of pale yellow. I chose BoBunny Alissa Kissable designer paper and Stampin' Up's So Saffron and Basic Black card stock.

The making of this card was very different from the norm because the focal image was stamped after basic construction of the card instead of at the beginning. I started with a standard sized card of black card stock, then measured a mat and designer paper to layer on the front. I used my nestabilities circles to carefully cut openings of gradually smaller sizes through the layers, treating the designer paper and mat as one. Next I placed a yellow mat and a white cardstock layer inside the card, aligning them carefully and faintly tracing through the card front around the circle with a pencil. I stamped the image with Memento Tuxedo Black ink, then colored around the silhouette very softly with prismas, blending the colors with gamsol.

To add a more finished look to the inside, I cut a scalloped edge frame using nestabilities rectangles, centering it so that it remained invisible through the card front when the card is closed. I kept things sweet and simple, adding only a bow of gold edged black organza ribbon to the front, and a small bow of glimmery ribbon on the inside. This card reminds me that God is pleased when we come to Him with a child-like faith and trust. I hope you're blessed by it! Thanks for visiting!

Sunday, April 26, 2009

Banana Split Sunday!

I'm very excited to have been invited to extend my time designing for the Bunch at 2RedBananas! I have enjoyed these past two months so much and just didn't want them to come to a close! I'm also very excited to welcome my friends Silke and Denise as guest designers for May and June! I have had the privilege of meeting these two in person, so being on a team with them is a special treat! I did a happy dance, but it was short and sweet because at the same time I learned that Jami and Maraya will both be going back to work and will not be able to continue alongside the rest of us. I just hope and pray that they stay in touch and come for frequent visits! Love y'all!

Today's Banana Split Sunday Challenge is to use stripes on your card. I had not yet gotten to ink up Jami's fun Hawaiian Chicken so I knew exactly what stamps and paper I wanted to use and couldn't wait to dress him up aloha-style. He definitely looks pau-hana (done w/ work!) and ready to hit the beach!

I stamped him twice on white card stock using Memento Rich Cocoa ink. I colored both images with prismas and gamsol, cutting out his beak, shirt and hat to pop them up on dimensionals. I stamped him a third time on striped designer paper to cut out and paper piece his surf board.

I love this Imaginisce designer paper and wanted to use the floral along with the stripes, so I made a criss-cross layout and added a bit of stitching, flowers, and pearls. The stitching reminds me of the hem of a shirt...the button on the sentiment brings out the blue stripes in the dp and just makes me think of the beautiful blue waters of the Hawaiian coast. They are a deeper blue than the more aqua colored Caribbean, which is equally breath-taking. My husband and I got married in St. John, USVI, then spent the first four years of our marriage on Oahu, so this Hawaiian Chicken brings back lots of fun memories for me!

I hope you'll play along with our challenge this week. Be sure to visit the Banana Blog to be inspired by our other designers...then come back to link your card on Mr. Linky so that you'll be eligible to win a prize! 2RB is giving away the My Mind's Eye Bloom Paper Pack to one lucky winner!

Saturday, April 25, 2009

Blog Awards!

It is such an honor to receive a blog award, and I recently have been blessed with two! The first is from my friend Silvia Mabie. I am so thrilled to be given this particular award, and I hope that I can continue to live in the Light of the life it calls me to live! Thank you so much Silvie! You have given me an enormous compliment! You are such an inspiration to me!

The second award is from my friend and Color Dare design team mate, Stephanie Castro. Steph is a huge blessing to me and is such an encourager! She always makes me feel so special...I just love the interaction we have online, and the phone conversations we share ever so often. Steph, your compliments are a treasure to me, and I'm so grateful for our friendship!

Since I'm leaving tomorrow to go home to Louisiana to help my mom take care of my dad who was just released from the hospital this morning after a total knee surgery, I hope you won't be disappointed if I delay following the rules and passing these along! Actually, I am happy to have some time to ponder, because there are so many wonderful stampers out there and I'm blessed that many of my stamping friends are Christian women of great character! I do hope to have internet access from my parents' computer, so hopefully you won't even miss me and I can come back to finish this post within a day or two! I just know that right now I've got to finish packing! The worst part of the job is trying to figure out exactly what stamping supplies I just cannot live without! Especially now that many of the airlines are charging by the suitcase for checked luggage!

Hope to see you soon! Blessings!
Friday, April 24, 2009

More news!

I have more exciting news to finally share! I have been invited to guest design for DRS Designs! I found out back in February that I would be designing for them during the months of May and June, and had to keep it quiet all this time...and then when it came close to time for our reveal, I found out that my *room-mate* (also guest designing for May and June) is my good friend Dawn Mercedes! We had a great laugh together over the phone about that! Sharing this experience with Dawn is gonna make it that much sweeter! I'm so excited!

You might have seen me sneak my DRS banner onto my blog a few days ago. For the last few days I have been holed up in my stamp room, stamping cards to send to them for an April 27th deadline. I'll be sharing those and more over the next several weeks.

The card above is a card I stamped this morning for today's Limited Supplies Challenge, *Make Yourself at Home.* Jeanne challenged us to use colors inspired by the decor of one of the rooms in our home. I have a lovely Ethan Allen chair made with this print...it is one of my favorites, so I decided to use DRS's backgrounders to make a card in these colors. I used markers directly to the stamp (P631 and H628) using Sage Shadow, Ruby Red, Creamy Caramel, and Blush Blossom, then stamped onto ivory cardstock. The sentiment (G604) and butterfly (G115) were stamped using Tim Holtz distress ink. I gave the butterfly body a little dusting of Fun Flock just for fun. I sponged all the cardstock, including the butterfly, mats and card base, using Tim Holtz distress inks, and after constructing the card, added a bow and a few contrasting buttons tied with cord as accents.

Wednesday, April 22, 2009

Color Dare #13

Color Dare 13's colors are Pacific Point, Pink Pirouette, and Rose Red...I am finding that these brighter color combinations are a real challenge for me!

I stamped yet another OCL image from i {heart} papers for this card! I am so hooked! I used Palette Noir ink, then colored with prismas and gamsol to shade these lovely tulips and vase. The pinks were easy, but the blue was a bit difficult to match and required quite a bit of layering of colors to get the correct hue.

I love the dotted swiss embossed background, and since I recently purchased some new Cuttlebug borders, I had to use those on my card! I like how that striped ribbon brings out the rose red in the tulips and the matting. The ribbon image at the base of the bouquet is popped up on dimensionals, but that doesn't show very well in this photo. A very CAS card, but because of the colors, it is an attention-grabber.

Riley's got the rest of our DT's cards posted on her blog! They're always fantastic and I know you'll be inspired! If you like to get the details, you can visit their blogs individually...links are on the right. You DEFINITELY wanna play along...there's a PRIZE this week!

Tuesday, April 21, 2009

Going Askew!

I just LOVE the Our Craft Lounge sets that Kate has at i {heart} papers! When our team was given the challenge to place our focal image askew, I thought of this fun dragon from the set, Drake the Dragon, and these fabulous, bright, fun papers!

I stamped Drake with Palette Noir ink, then colored him with prismas and gamsol in flaming yellows, oranges and reds to match this colorful My Mind's Eye funky floral/melon plaid paper. I really loved the side-by-side panels of Mojo Sketch #81, so I began there but added a single image askew, matting it with a scalloped nestabilities rectangle. I topped the image with a layered felt flower, a corded button, and then added some shimmery glimmer mint ribbon to the bottom edge to bring some balance to the layout and colors. I hope you like it! This card just screams summer to me! It gets HOT in Florida! ;)

Check out all the image askew cards from our ihp team! Links are on the sidebar to the right!

Sunday, April 19, 2009

Banana Split Sunday!

Chicken Impossible!It's 2RedBananas' Banana Split Sunday, and today's challenge title is *You're an Animal!* I thought it would be really fun to dress up Chicken Impossible in an animal print trench coat!

I started off by scanning The Paper Studio's leopard print designer paper, re-scaling it to a size that would be appropriate for paper piecing the trench coat and printing it on regular printer paper. I stamped the image on it, shaded under the collar and colored the belt with prisma color pencils, then cut the pieces out and glued them to my prismas and gamsol colored bird. The piece of vanilla cardstock with the completed image was then passed through the Cuttlebug with a circle nestability to cut and again to emboss the edges. I used a scalloped edge circle to punch a black mat.

The rest of the card I kept uncomplicated and open, loosely based on a sketch by my friend Kendra. I cut a strip of the designer print, matted it with black, then topped it with a matted sentiment stamped in black on vanilla cardstock. I finished with a couple of primas with black button centers. Such a fun card to make! I think the recipient will get a big kick out of it!

Visit the Banana Blog to see what the rest of the banana crew has created! We'd love for you to join us, so play along and post your link there!

Friday, April 17, 2009

Blog Candy Alert!

My i {heart} papers design team mate Meredith has blog candy up for grabs, so make sure you visit her blog to make a comment and become eligible to win! You have until midnight EST to enter.

I'm going to the local scrapbook store this morning to stamp with friends! I'm so happy to get to have some girl time! I'll be back later with a card and hopefully some pictures to add to this post!

Wednesday, April 15, 2009

Sweet 'n Sassy DT Round-up

Usually for design team round-up I try to make a fancier-than-normal project, but this month I really wanted to stick to something rather clean and simple. Sometimes it feels good to just go back to basics and let beautiful paper and a great image take center stage without a lot of competition from other design elements. I love the sense of accomplishment that I feel after finishing a quick project like this...in just a few minutes it is complete, and although it is simple, it is pretty enough to give as a gift...although you might want one for yourself too! It makes an every-day thing lots prettier to use and nicer to have laying around!

I really love this designer paper from Basic Grey, and when I saw a pink post-it note pad sitting on my computer desk I decided to combine the two to make a note holder to keep handy. I used three 4-inch square coasters and three harmonizing prints of paper along with Sweet 'n Sassy's new release, Dream Silhouettes.

I cut a strip of coaster ½ inch wide for a spine, then laid it between the other two coasters on top of a piece of pink designer paper, leaving about ¼ inch between each piece and ~1/2 inch extra of paper around all the edges. I folded the edges over to the inside, mitering around the curved edges of the coaster corners, adhering them with mono multi glue. Next I stamped the Dream Silhouettes image onto the front using Memento Rich Cocoa ink. I added a strip of designer paper to the bottom portion of the panel, then glued a piece of layered ribbon around to cover the seam. I added a square of the same designer paper to the back cover, punching all four corners with a corner rounder to match the rounded edges of the coaster.

For the inside, I cut a piece of polka dot paper approximately ¼ inch smaller than the entire length of the project. I adhered it to the inside, covering the ribbon ends, and using a bone-folder to crease between the edges of the coasters and spine so that when the *book* is closed, the inside doesn't buckle.

To finish my project, I added a small bow atop the ribbon. I stamped the Dream sentiment onto a Tim Holtz clear acrylic tag with Timber Brown Stazon ink (be sure to let it dry for a while before trying to handle it!), then tied the tag to the bow with white cording.

I missed blogging my inspiration challenge card from Saturday, and since it also uses Dream Silhouettes, I decided to include it with this post. It was inspired by a portion of this Prairie Landscape print at Grandin Road. The picture really doesn't do this card justice...sponging seems to sometimes confuse my camera and cause the picture to appear grainy, and reds are the worst!

Color Dare #12

It's Color Dare time again! This week's colors (Baja Breeze, Really Rust, Summer Sun + any neutral) stumped me at first, and then I remembered Asela's set, Flowers for Daisy.

I stamped the flowers on watercolor paper using Memento Ink (I wanted to see how Memento would behave...and it ran a little bit! Next time I'll use Stazon!) Using an aquapainter, I colored in a pale background, then layered in yellow, rust, and brown to give depth to the flower petals. I wanted to use some primas, but none of the flowers that I have (and I have alot!) really made me happy, so I opted to place some jewels and sheer ribbon for embellishments. Since I didn't want to cover up any of my flowers, I stamped the sentiment directly onto the card base.

Visit Riley's blog to see what my DT mates have made. Grab some inspiration there and then play along with us!

Tuesday, April 14, 2009

Today's Color Challenge

Today when the colors for CC214 were posted, I knew INSTANTLY what I wanted to do. That very rarely happens and when it does, it is SO nice! I am really pleased with how this card turned out...and that isn't something that I say very often! I just LOVE these chicks! They're from Jami Bova's new set, Chicken Dumpling, available now at 2RedBananas!

I stamped two chicks on white cardstock using Memento Tuxedo Black ink. I used prismas and gamsol to color them, and then cut them out. I ran some cardstock panels through the cuttlebug, then assembled everything with mono multi using Mojo Sketch #81. Easy peasy card! Who knows how long it'll be before I get to actually give it to someone! Anybody know someone having fraternal twins?

Sunday, April 12, 2009

Happy Easter!

I hope you have enjoyed this day of celebration with family and friends! We started our day with sunrise service followed by pancake breakfast hosted by our youth group. Our church also has contemporary and traditional worship services, and since my son and I both sing with the praise team/choir, we stayed for those also. Afterward we went to a favorite local cafe for brunch.

It was a real treat for me to get to play the Featured Stamper challenge this afternoon! That is something I don't typically get to do. Today's featured stamper is **Inge** and what an amazing gallery she has! Here's the card I chose to CASE. I just loved the out of the box image and the fun layout. My card uses one of my favorite Stampendous Changito stamp sets (it's ON SALE NOW!) and both sides of Upsy Daisy Hopscotch designer paper which are available at i {heart} papers.

I stamped the image on white cardstock with Palette Noir ink, then coloring with prismas and gamsol. I used various shades of brown, gold and green to color the image and bring high- and low-lights to the leaves and palm tree trunk. Then I cut around the top half of the tree trunk. I stamped the leaves again, colored them and cut them out, adhering them with dimensionals to the out of the box portion of the image. I used a cuttlebug embossing folder to add some texture to the layer behind the palm leaves. I kept the same layout **Inge** used, changing the flowers to a clip of ribbon, and the photo turns to a large button embellished with a tiny flower. I like how clean and bright this card is, and I hope you like it too!

Saturday, April 11, 2009

2RB Sketch Challenge for Banana Split Sunday!

Today all the 2RB designers are debuting sets using a sketch challenge that Jami posted. It's our Banana Split Sunday challenge making its appearance one day early because tomorrow is Easter Sunday. PRIZE ALERT!!! The winner of the challenge this week will get to pick any of the new releases from this month - they'll be available in the store on Monday!! To be eligible to win you must head to the Banana Blog to link up your creation to Mr Linky.

My card features the new set, The Early Birds. Isn't this bird with his food-stuffed cheeks just the cutest thing!? I used Memento ink to stamp the bird on vanilla card stock. Then I colored with prismas and gamsol, layering the color on in oranges and reds. I stamped a portion of a second image on designer paper and cut out the scarf, popping it up to add dimension and depth. I sketched in a little dirt and grass with prismas, then outlined with a Copic multi-liner so that the bird would look grounded rather than floating (now you know why I'm a stamper and not an illustrator!). Finally, I added a bit of shading with a Copic cool gray marker and a blender pen, and dotted his cheeks with a white gelpen.

I used some great My Mind's Eye designer paper for my card...the leaf print is called Falling Leaves and has a beautiful and elegant green print on the flip side. The teal dots are the reverse of Lots of Dots, a very fun, colorful polka dot print. SU card stock layers included Old Olive, Tangerine Tango, and Groovy Guava. I punched an embellishment with my nesties, the only swirly embellishment I had that would work with this sketch, then topped it with a few flowers and some bling.

Make sure you visit my 2RB friends Teresa and Wendy to see their versions of this sketch and Abbey Westemeyer's set, The Early Birds. Jami, Maraya, and Jeanette will have sketch cards posted too, so check out my sidebar to see if they've updated. You don't wanna miss 'em!

Friday, April 10, 2009

Day 5 of 2RB Sneaks!

Today Jami, Maraya, and Jeanette are giving you sneak peeks of one or the other of two new sets, Chicken Impossible and Hawaiian Chicken. I'm sure you'll agree with me...every one of these chicken sets is SO fun! I must admit, I'm a little partial to Cajun Chicken and Hawaiian chicken, having grown up in Louisiana and then living in Hawaii for four years! ;)

I'm up in my craft room today (the spare bedroom...I'm wishing for a *real* craft room in the worst way!), working on some other new things to show you...so I am hoping to be back in a bit! Then I'll be going to Good Friday services later this evening. Of course, this service is one of the most somber of the year as we remember the crucifixion and death of Christ and in response strip the church of all its light and vestments, but even Good Friday is filled with the hope of Life and Resurrection. After all, it was the Day the Temple Veil was torn in two, from top to bottom!

So maybe I'll see you later, or for sure tomorrow!

Thursday, April 9, 2009

Rabbit Food

I had so much fun with today's challenge! I actually got to make 2 projects for it!

The first is this adorable owl! This image and all the elements in this card were given to me by my new friend Asela. I colored him with prismas and gamsol. I trimmed a piece of card stock to 3/8" and ran it through the Dymo to make the sentiment. Such a fun little card! This will be in the mail very soon to someone special!

Earlier today I saw a carrot in the gallery, and it reminded me that my upline had given me a carrot template last year (available on SCS.) I had this great My Mind's Eye designer paper and I decided that I just *needed* to make a carrot for my favorite rabbit! Here it is, paired with some re-purposed green raffia and the bunny from 2RB's Caring Critters, illustrated by Jami Bova, aka Sgt. Stamper. I punched another sentiment out with the Dymo and then added a few punched hearts. So fun, and kinda cute! I hope you like it!

A Spring Thing!

The 2RedBananas Week of Peeks has been so much fun, and today I'm delighted to show you Abbey Westemeyer's new set, A Spring Thing! I wanted to use this fun Easter paper and make something 3-D, so I decided to make a box in a bag and put this cute little girlie tag on it.

This project was really fast, fun and easy! Here are the instructions. For the tag, I stamped the images on white cardstock using Memento Tuxedo Black ink, then colored them with prismas and gamsol. A flower and some bling add a pop of extra color, texture and dimension.

I think my young friend Jessica will love this! It makes the perfect quick gift for tucking in some candy, flowers, or other Easter goodies.

To see more sneak peeks of this cute set, visit Maraya and Jeanette!

Wednesday, April 8, 2009

Day 3 of 2RB Week of Peeks!

More fun previews from the girls at 2RedBananas! Be sure to check out the blogs belonging to Jami, Wendy, and Teresa as well as the 2RedBananas blog for today's sneak peeks!

Color Dare!

This week's Color Dare colors are Close to Cocoa, Brocade Blue, and Pale Plum. At first all I could think of was flowers, and then I remembered this cute Lelo from Tree House Stamps. I think he is precious, and he looks pretty cute in pale plum and blue!

I stamped Lelo in black ink, then colored him with prismas and baby oil. I used my Copic cool gray marker and blender pen to add a light shadow. Next, I ran a piece of Pale Plum through the Cuttlebug with a reptile texture embossing folder, then swept over it lightly with a sponge using Brocade Blue ink. I cut a mat of Brocade Blue cardstock with my scalloped nesties, making two passes to shorten the length of it to fit my focal image. The ribbon is *recycled* from I can't remember where. I rounded the corners of the focal image panel in order to add some chocolate chip buttons to harmonize with the chocolate chip card base.

I think this would make a fun kiddie birthday card, or maybe even a new baby boy card. I hope I've inspired you to play along, and upload your cards using the keyword CD11. Leave a link so our team can take a peek!

Tuesday, April 7, 2009

What an amazing day!

Hello everyone! No card for you today...Tuesday is the longest day of my week, and today there have been extra distractions. The garage door opener decided to break, dh is at home not feeling well, etc. You know how some days go! Thankfully, the repairman is here with the part we need and we'll be back in operation in no time, minus about $150.

Just a reminder: today is Day 2 of 2RedBananas' Week of Peeks. Wendy, Teresa, and Jeanette each are previewing the new April journaling spot. Be sure to check it out and also to come back tomorrow for a sneak peek at another soon-to-be released set.

Now, to tell you about my absolutely amazing day! I woke up yesterday to find that my SNS Be Blessed card had been chosen as card of the week on Stamp TV's Florida group. Such a nice surprise first thing in the morning! Then at noon, I found out that my most recent Color Dare card was chosen as one of 10 cards for Stamp TV's Center Stage! See that cool logo I get to keep on my blog for a month?! OMGoodness! Let me tell ya, my feet have barely touched the ground since all this excitement! I just don't think it could get much better than this! ;) I don't remember being this excited in ages! I have had trouble concentrating from sheer giddiness...and now I need to go upstairs to finish my card for tomorrow's Color Dare because I'm sure Riley is wondering where it is!

Have a great Tuesday...see you tomorrow!

Monday, April 6, 2009

Flourishes!

Back when I went to the Copic Certification in Pensacola, I bought a few Flourishes sets, and I have been patiently waiting to ink them up...I had the BEST time that weekend, celebrating my Louisiana heritage and learning some fabulous new stamping techniques. This week's Flourishes paper piecing challenge was the perfect opportunity to finally ink up one of those new sets, so this is the card I came up with. I actually have an Ethan Allen chair that looks very similar in style to this one in a beautiful floral print. Mine has a fringed, striped pillow and matching ottoman, and I just love it!

I used Memento ink to stamp the upholstery for this elegant chair onto Basic Grey's designer paper...I stamped it again onto a piece of ivory cardstock, then colored the wooden parts with prismas and baby oil, first with browns and then with gold. I cut out all the upholstery pieces, then inked all the edges with Tim Holtz distress ink, and glued them in place, then shaded around the edges of the entire image with a Copic marker and blender pen. I constructed the card using a very simple layout of designer paper matted with a burgundy cardstock atop a River Rock cardstock base. I added a horizontal band of Basic Grey paper punched with a Martha Stewart doily edge punch...all the edges were inked with distress ink. Embellishments included a bow of sheer gold ribbon and a Tim Holtz keyhole accent.

2RedBananas' Week of Peeks!

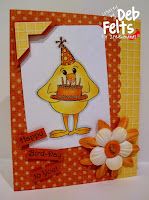
Happy Bird Day!I am so excited that this week is finally here! It is going to be a phenomenal week! It's 2RedBananas' Week of Peeks, and there are so many fun, fantastic sets to share! Once again I'm glad that I'm assigned sets, because otherwise it would be hard to choose which one to ink up first!

Don't you just LOVE this funny feathered fellow?! He's from Jami Bova's new set, Birthday Chicken! I think he is the cutest ever! I inked him up with Memento Tuxedo Black ink, then colored him with prismas and baby oil. I added a little shading around the outer edges with a Copic cool gray marker and a blender pen. This bright polka dot paper from October Afternoon is the perfect match for him. I cut a wide panel, scalloped the edge, then layered it over a narrow strip of Hot Chicks paper from Imaginisce on a base of Tangerine Tango.

I wanted to keep this layout open and bright, so I kept the layers minimal. I used SU's photo corner punch to make an accent for the top left corner of the focal image using tangerine card stock and some Hot Chicks paper. I stamped the sentiment (this set has several fun sentiments!) on tangerine card stock and cut the words into strips. I layered a flower atop another blossom from my paper petals stash, then added a cord-tied button to give it some pop.

I know that this bright, happy card is gonna bring big smiles and maybe even a laugh or two! I hope you like it! Be sure to visit my 2RB design-team mates Jami and Maraya to see what sneak peeks they've got in store for you today. Each day this week 3 of us will be previewing sets, so keep coming back to see who's got what!

Sunday, April 5, 2009

Banana Split Sunday!

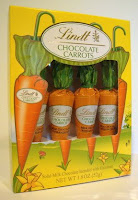
Lindt ChocolatesI found these little candy boxes at Publix and had to grab one because I knew it would be a fun thing to alter. I had just received this little bunny in a new 2RedBananas set and immediately thought the two just *had* to go together. You can imagine my excitement when this week's Banana Split Sunday challenge, just in time for Easter, was *NOT a card!*

This really was an easy project. I cut a piece of double sided Patio Umbrella designer paper, scored it, then ran it through my cuttlebug with a Nestabilities scalloped heart die to make the little window. I slid a piece of acetate in place against the window, slit the corners of the top and glued the flaps together. Easy peasy! Now for the fun part!

I stamped these adorable Caring Critters on ivory card stock, then used prismas and gamsol (I finally bought some!) to color them. I matted a strip of the coordinating flip-side of the designer paper to make a belly-band for the sentiment, which is from Abbey's set, Bunnies and Eggs. I adhered the belly band to the mat only in a couple of spots to give it a bit of wiggle room as I wrapped it around the box and creased the folds. This seems to work better than pre-scoring so long as you make sure it's nice and straight as you go around! Then I cut out the stamped images and glued them in place. I added a prima with a cord-tied button to the corner.

I think projects like this are so much fun, and the results are well worth the extra time it takes to make them. What a great little Easter surprise!

Thursday, April 2, 2009

SNS Blog Hop, Day 3

Hello and welcome! If you've been following Sweet 'n Sassy's blog hop I know you've seen some amazing inspiration! The new releases this month are fabulous, and my design team friends really know how to show 'em off!

For my card I used the beautiful set, Dream Silhouettes. I love these images! I'm from Louisiana, and they remind me of the grasses at the edge of the swamp behind my brother's house on the Calcasieu River near Lake Charles. At times, the sky is hazy white but the sun still burns hot and bright on through the evening. I have fond memories of fishing there all through the years. As a little girl I stood on the banks with a tiny net trying to catch minnows. A few years ago I caught 14 fish in 12 minutes (I'm not exaggerating!) and my dad was stunned that I was willing to bait my own hook and take the fish off when I caught it! :)

First I used a small sea sponge to apply a bit of Soft Sky ink to white card stock. I stamped the rushes twice, using River Rock and then Mellow Moss. For the sun, I used Groovy Guava rock 'n rolled on one edge with Really Rust. The birds are Baja Breeze. I cut and embossed the image using my Nestabilities Label 2 die, then used a cosmetic sponge to add a bit of soft sky around the edges.

My card is made with Basic Grey's beautiful Marrakesh papers, and River Rock, Groovy Guava, and Baja Breeze cardstock. These colors worked well with the look I wanted to achieve, and they also fit Sandy's color challenge to make a card using orange, blue and green. I added a layered prima flower with a bow of two-toned ribbon. I went back and forth about whether to add the sentiment because it covers up so much of the lovely nesties shape, but decided to leave it so you could see what words come with the set. They so aptly describe where I am in life right now! I feel I am just *standing on the threshold* of this amazing hobby...there's so much to learn and look forward to! I am loving every minute of it!

From here you should head back to Sweet 'n Sassy's blog to wrap things up. I hope you'll join us for tonight's release party. Words do NOT express how much fun we have, so you absolutely don't want to miss it! There are challenges for card-making (did you notice them during your blog hopping?) and prizes to win. I will warn you ahead of time...get your snacks and drinks at the ready, and then at the last minute go to the bathroom so you won't have to miss anything once the party starts! ;) See you at 9pm EST on the Sweet 'n Sassy Forum.

P.S. Some of you have asked about getting updates from my blog via email, so I finally figured out how to add that option to my sidebar. I hope you'll take advantage of it! Blessings!
Wednesday, April 1, 2009

Sweet 'n Sassy Blog Hop and a Sketch!

Today is the beginning of Sweet 'n Sassy's blog hop...I love blog hop time, because there are always so many fabulous new sets and wonderful ideas for how to use them. Our design team is simply amazing! Not only do they stamp gorgeous cards...they're just simply amazing, wonderful women! Hey girls! Love y'all! :)

For Suzy's sketch I used a soon to be released set called Be Blessed. I colored her in with my new Copic markers! (I'm SO excited to have nearly doubled my inventory from somewhere around 10 to about 20 just in the last week with the arrival of my first order from SNS's Copic Club.) After coloring, I stamped over the top of the entire image with SU's linen background using Tim Holtz distress ink, then liberally distress-inked the edges.

My card is constructed using a print from the Sugared Basic Grey 6 x 6 pack of designer paper. I folded a flower and inserted a few stamen inside, then threaded it through two tiny holes punched above and below the doll's hands. I kept the rest of the embellishments simple, adding a sheer ribbon bow and a few buttons to go along with the vintage feel. She reminds me of my neighbor's beloved "Mr. Puppy" whose terry cloth body and manufacturer's tag were "loved" away until their texture almost totally disappeared.

Color Dare!

It's Color Dare time again! I must admit, I LOVE this image, but I am not loving this card so much! I'm hoping it is gonna grow on me! These colors--Taken with Teal, Tangerine Tango, and Kiwi Kiss--were a real challenge!

When I had lunch with Asela a while back, she gave me a little package of stamped images using stamps from the sets she has illustrated. I just love 'em! This one is from her set, Flowers for Daisy. Thanks so much, Asela! I am so happy to have a set of my own now!

I sat at the breakfast nook table Monday night coloring this and watching Dancing with the Stars! Love LOVE that show! Honestly, I think I color much better during the daylight hours than I do at night under artificial light! I was hoping to make the vase look realistic, and that the tablecloth would look like a shadow-stripe fabric print. It didn't turn out quite the way I had expected, especially when the shading in the background came out looking a bit murky and smudged. I wish now that I had used my copic shader instead of the black prisma pencil (since I don't have any shades of gray in my 42 color set). Ah, well, live and learn!

I stamped the larger blossoms with Versamark on some Taken with Teal to add some interest to the background. I used some SU Basic Gray card stock to mat the focal image, which helped to balance the gray from the shadows and silver of the taffeta ribbon, which was the only ribbon I had that would work with these colors. To finish, I added a few strokes of white gel pen to the vase, then colored over the vase from top to bottom with a clear Spica At-You pen hoping to make it look like frosted glass. I also added a few little specks of gold Spica to the flower centers. I pierced around the focal image, then added a few flame dew drops along either side.

I am anxious to see what my Color Dare friends came up with for this challenging color combo! The links to their blogs are on the right. Be sure to visit, and then play along! If you can come up with something for challenging colors, it will help your stamping tremendously because the rest oughta be a piece of cake! ;)