Thursday, November 8, 2018

Time for a Cup!


I absolutely adore Authentique's new Jingle designer paper!  Just look how darling this vintage image is!  As I flipped through the pad and came across this image and the cute coffee cup paper, it made me think of stopping in the midst of a Christmas shopping spree for a cup of hot coffee with a friend and a rest from the frenzy!  And so...I just had to make a k-cup holder for today's Stamp Simply project.


There are a lot of different designs for k-cup holders on YouTube. Here's a tutorial for how this particular one is made.  These go together really quickly when you use dies, quick solid stamps that do not require coloring, and printed tags/images.


All of the supplies I used are listed here:

Thursday, November 1, 2018

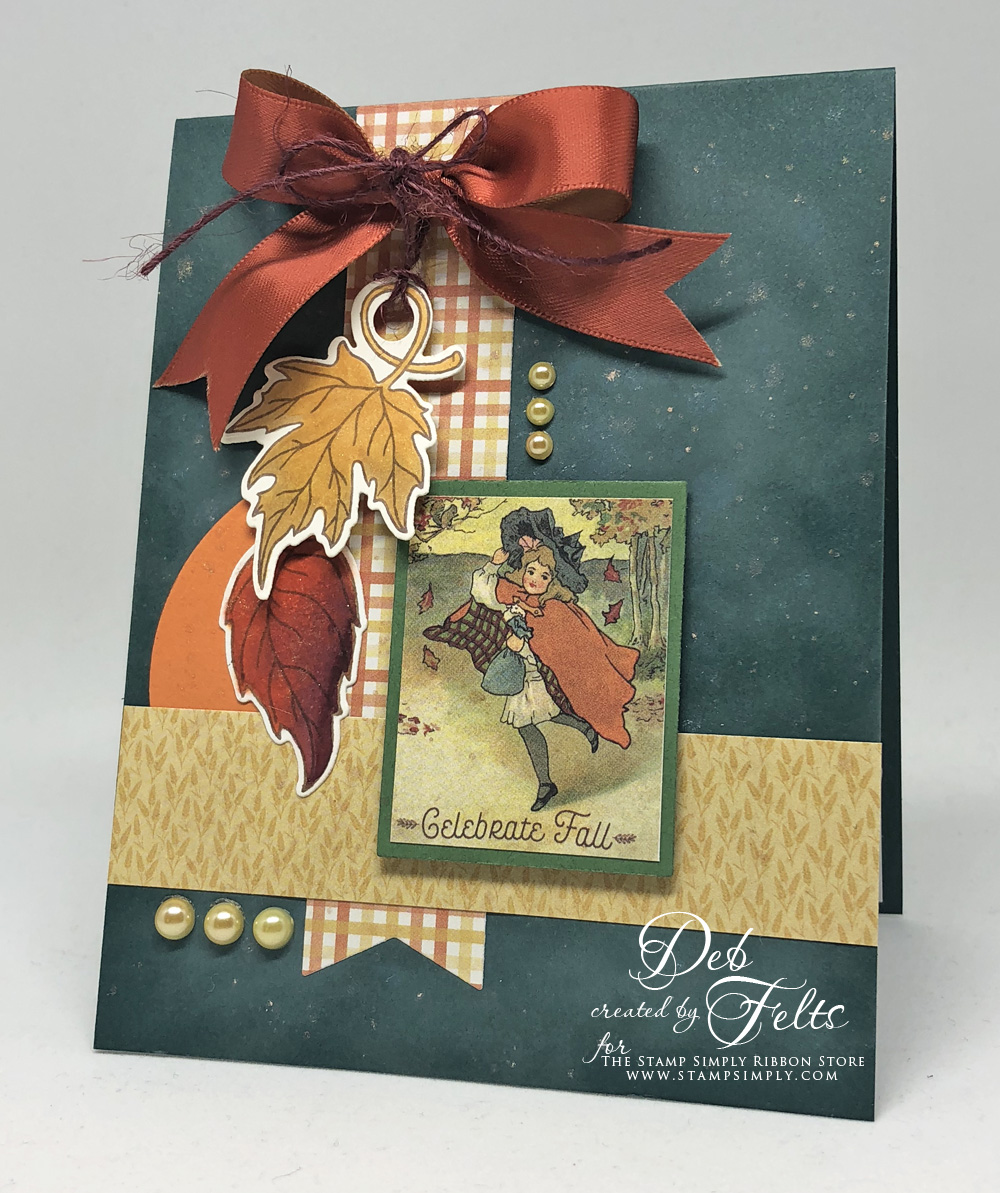
Celebrate Fall!


Between my recent foray into historical fashion and Halloween this week, it seems like Life has centered around costuming, so I could not resist this "not quite Little Red Riding Hood" image for today's Stamp Simply card.  I love the soft misty greens of the printed image and tried to incorporate the colors and haziness into the background of my card using distress oxides and splashes of glittery Delicata ink.


The flurry of leaves surrounding the girl inspired the addition of a few stamped, Copic colored die cut leaves as accents to carry the theme further.


The inside is simple, with a bronze wheat sheaf and the script from our newest Autumn stamp set.  I love how well our older sets coordinate with the newer ones to give even more versatility.

Here are the supplies:

Thursday, October 25, 2018

You Color My World


and I'm thankful for you!  

I just got a box of some beautiful new supplies from Stamp Simply, including this lovely package of Fall paper from Authentique.  In addition to some gorgeous prints it includes several sheets of small printed rectangular images and sentiments, which inspired this peek-a-boo style window card.  The opening of the window is embellished with a lovely scrolling frame and a distress-oxide-inked spray of leaves and glittering roses


Once opened, the "Thankful for You" sentiment from our new Autumn Blessings set is revealed.  I'm so grateful for the friends who color my world and help to make my life vibrant, interesting, and exciting!  


This card is going to one of my reenacting friends who went way above and beyond to help me get my 1888 bustle dress ready for an event that we had last Friday night at the Lightner Museum in St. Augustine.


Here are the supplies I used for today's project:

Thursday, October 18, 2018

Autumn Blessings


I've been seeing beautiful photos of lovely Fall colors lately, but Fall has not yet arrived here in NE Florida.  Supposedly yesterday was forecast to be our last 90 degree day of the year!  Ha!  We'll see!  

I have a relatively clean and simple Autumn card for today's Stamp Simply project.  The tiny floral print on this rust-colored designer paper harmonizes beautifully with our new Autumn Blessings stamp and die combo.  I used fired brick distress ink to sponge the edges of the ivory card stock to soften the contrast.  


I stamped the wheat sheaves using antique linen distress oxide ink and after it was dry, went over it with a glitter marker.  So sparkly and simply beautiful!  The rope tie was colored with a Copic marker.  


The inside of the card has the same sponging along with a little fishtail banner strip of the designer paper and a die-cut sheaf of wheat.  I love that we have the coordinating dies for these images because it increases the options for using the stamps and makes a popped up image so easy.  

Here are the products I used for today's card:

Thursday, October 11, 2018

Good Treasure


Last week my two brothers and sister-in-law spent the week at Cruisin' the Coast.  The cool thing about it is that Tom and Bridget drove their 1950 Buick Super that Tom had just finished restoring all the way from Dallas to pick up Jerry in Louisiana and then head on over to Pascagoula, MS.  The car had been owned by a Buick salesman and had sat unstarted for 30+ years...Tom bought it from its second owner, and spent three weeks short of a year polishing it up, replacing the interior, and getting it running.  All that elbow grease to get the original paint job and chrome sparkling and gorgeous is what inspired today's project.  That kind of perseverance takes (and makes!) character!   

Yep!  I'm more than a little proud of my brother(s)!   

Authentique's retro Dapper designer paper (especially this particular print!) was absolutely perfect for this project!  I just had to combine it with some shiny silver mirror "chrome" paper and a few clear rhinestones for the "checklist" that runs across the top of the paper.  


This sentiment is from one of our newer Stamp Simply sets, A Godly Man.  Tom, through patience and diligence, brought out the good treasure hidden in that old car.  I love allegory and metaphor...this makes me think of the way the Lord transforms our hearts and minds and renews our spirits.  Then, from that good treasure, something good can come forth to bless others.


Since the design of this card is relatively flat it should be easy to mail, although with the larger square format and a few rhinestones it will require hand cancelling.  Inside...three rhinestones, one for each week short of a year that it took to do the work!  ;)

Here are the supplies that I used for today's project:
And here are before and after photos of "Sweet Thang" in all her glory!  It's amazing what Turtle Wax and elbow grease uncovered!


And just to be fair...here's my other brother's beauty!  This is what a 23 year old paint job on a show winning 1965 426 HEMI Belvedere should look like!!!  Well taken care of by my brother Jerry.

Thursday, October 4, 2018

Seek First the Kingdom


We have more new stamps from Stamp Simply!  It is so inspiring to have new stamps to play with, especially when they're great scripture sets!  This project was inspired by the awe of God that is the heart's response to the majesty and glory of His creation.  The paper reminds me of a trip that my husband and I took to Yellowstone.  God's creativity on display at every turn!  

The sentiment on the front is from our new Pastor and Ministry Appreciation set, stamped directly onto the designer paper.


The one on the inside, stamped on one of the paper pad's punch out elements, is from Autumn Blessings.    

Thursday, September 27, 2018

Joshua 24:15


Another serendipitous scattering of supplies on my desk provided the inspiration for today's card.  Not long after I sat down to stamp I was interrupted, and the idea for a simple layout took shape as the day unfolded, so this card came together fairly quickly.  I love when that happens!    


The scriptural focal point, part of our new set, A Godly Man, is stamped on a blue grommet tag die.  The tag needed a little more oomph to stand out from the background so I die-cut a second one in white, quartered it and used it to frame the edges.  If you look closely in the center you can see a small slice of white card stock glued in between to make the splice job less obvious.  The ribbon covers the places on the ends where there is no white border.  


The inside features a sentiment from another new set, Farmhouse All Occasion Greetings.  There's lots of white space with a little repetition of the colors from the card front.  

Supplies, all from Stamp Simply:

Thursday, September 20, 2018

Farmhouse Christmas


We at Stamp Simply are excited to be expanding our Farmhouse Series.  My card for today was created using Farmhouse Christmas. This set has several solid images that are perfect for the holidays along with some wonderful greetings which are ideal for either cards or tags.  I had a lot of fun playing with our new stamps and also with some older dies in unconventional ways to create a snowy farmhouse barn wood door for this project. 


The window panes were made using a single square die, repetitively cut and then using the remaining negative,  adhering it to mirror paper and scraping some gesso "snow" into the corners. The wreath was made by die-cutting multiples of one of the dies from the Spellbinders' foliage set,  arranging the boughs in a circle and adding a ribbon banner, enamel dots, gesso snow, a jute string bow and Petaloo blossom.

The doorknob is another Spellbinders' die (an old one, now retired, but these are similar), using the positive for the base and the negative for the curved "handle" part.  Adding the doorknob and some snowdrifts with the sentiment (I love the font used for this series!) really helped to convey the idea of a Farmhouse Christmas door, and hopefully you have a vision of a warm kitchen with scents of cinnamon, vanilla, and maybe some hot chocolate just beyond on the other side!   


The inside of the card is embellished with a cute tree stamp and another sentiment from the new set.  I used markers directly to the stamp, adding accents over the wet marker with a gessoed paintbrush and then giving everything (inside and out) a dusting of diluted gesso snow.  

I couldn't resist adding a tiny farmhouse in the corner just for fun.

Here are the supplies used for this project:
I'll be back on Saturday with a card using another new set, Farmhouse All Occasion Greetings.  Hope to see you then!  

Thursday, September 6, 2018

Anniversary Wishes


I had so much fun getting inky with these blinding bright colors for today's project for Stamp Simply!  The whole idea started with the cute printed designer paper upon which the "Anniversary Wishes" sentiment was stamped.  It kinda reminded me of some of the really cute tall skinny magnetic notepads we've had stuck on our refrigerator for making grocery lists, so I decided to give it center stage and stamp on it.  :)


The base layers of the card were a little too plain compared to all the happiness going on, so I had to add some stenciling to make things more interesting.

Next I layered pink and orange ribbons with some bitty blossom flowers and leaves, jute string, and a little dangling heart to bring in lots of texture and dimension.  It was fun to pick out the colors of the paper and make sure they repeated in other areas of the design...like the green of the leaves and the addition of the enamel dots to the plant stem in the upper right corner.  


Inside there is more bright color along with a coordinating sentiment.  When it was all finished it just needed a little splash of white to tie everything together, so I diluted some ivory acrylic paint and splattered it everywhere with a paintbrush.  

Supplies: