Thursday, February 29, 2024

The Way, the Truth, and the Life


Hi everyone and welcome on this Leap Day Thursday!  We're having a sale, so be sure to scroll at least far enough to see what that's all about!    

Usually my projects come together by auditioning various stamps, papers and embellishments along the way but every once in a while I will have a pre-crafting glimpse of an idea.  That's what happened with today's card...I saw the colors and design in my mind's eye one evening and went up to the studio the next morning to put it together.  It's a simple design that lets the scriptures speak for themselves.  


I've been spending a lot of time with these "champagne/ballet/baby"  pinks lately (in my spinning and in my knitting as well as my card-making) so that may be partly why these particular papers and ribbons really spoke to me.  (I'll share photos of the other crafts after the paper-crafting for those who'd like to see).  


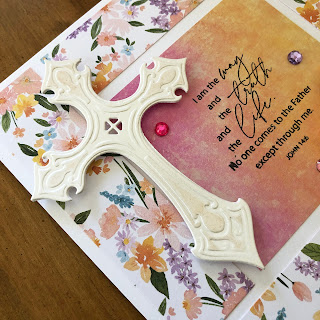
The focus of this card is one of our scripture sentiments stamped on a beautiful wash of colors from Craft Consortium's Grunge Light paper pad.  The "frame" is a print from Echo Park's My Favorite Easter.  I've really enjoyed playing with prints from this assortment.   


The cross is die cut from pearlescent white card stock.  I gave it the faintest hint of blush with a pale peachy-pink Copic marker.  


I used a length of narrow silk ribbon to make a fluffy bow and added paper flowers and sparkly beads in colors drawn from the patterned paper.  There are a few rhinestones of various colors sprinkled across the card front as well.  


And here is the inside...more of that beautiful paper with coordinating scriptures and a simple heart-shaped die at the center.  

Supplies:


**************

If you're interested in the other crafts too, keep reading and scrolling!  


Here are the promised photos of my other crafts.  I'm spinning fiber from my friend Rebecca using a Jenkins finch Turkish spindle.  The photo above is the most accurate color representation...for some reason this color really freaks my iPhone out and I have trouble capturing it accurately, especially when it's cloudy outside.


A faded photo but it shows my progress. Still a bit of braid to go. I haven't decided yet what I'll knit with this yarn once it is finished.
 

This is commercial "Emma's Yarn" in the (pinker than it looks here) color way "Himalayan Salt" on two different bases (one fingering wool/silk, the other Suri Alpaca/silk).  Yes, I told you that I love this color!  


This is the "Lenu" sweater that I started in mid-January using the commercial yarns shown above, held together as one.  It is knitting up so soft and squishy!  I am hoping to finish it to Scotland and wear in late April.  Just one sleeve and a few inches of body to go!  The pattern has a separate hoodie with a coordinating stitch pattern so if I have enough time I'll knit that too.


And surprise!  Just to keep things lively, two separate views of a single sock in Mardi Gras colors that I acid-dyed onto Knit Picks Stroll Bare!  This is my qualifier for this year's Sock Madness. I will not likely finish its mate in time because we both got the flu and I just did not feel like doing anything, even knitting. What a shame that when one has all that unoccupied time in the easy chair, there's no energy or focus to do anything constructive with it!


I've finally managed to finish just this one sock so hopefully I can at least qualify for cheerleader, which means being granted access to the rest of this year's Sock Madness patterns.  I'm still knitting but it would take a miracle to finish another sock by the deadline (which is in the wee hours of Friday morning).  Yes, I am a little bummed but hey, Life happens!

Thanks for visiting my blog on this special day!  Hope to see you again soon!  

Thursday, February 22, 2024

Dial-a-doodle-doo!


Hi everyone!  

If you've been around for a while you know that I love to spin, and for a spinner, Spring is the season for shearing and new fleece to wash/process/spin.  So here is a viewfinder "dial a doodle-doo" card featuring some barnyard friends along with a few treasured words of wisdom.


The base of this card is 4.0 x 5.5 inches, but the overhanging banner and the edge of the viewfinder spinner bring the measurement to the full standard 4.25 inches wide.  


I used the largest Spellbinders die to cut one circle from card stock and another from copy paper.  Folding the copy paper circle in half and then in half again helps to find where to punch a tiny hole in its very center.  I also used the template to divide the spinner into quadrants for aligning the individual stamps.


You'll need to be careful to align your spinner so that there is that little bit of overhang, but still room for the other elements and embellishments you wish to include on your card front.  


I figured out the placement of the brad and then decided what pair of circle dies to use for the "peek" part of the viewfinder.  Take care to align the opening so that the edges of the larger circle do not show through from underneath.  I like for the mat layers to show, so I cut the larger circle of the pair where I want it to go on the thin designer paper.  After glueing the designer paper to the underneath layer, the smaller circle is easy to align to cut the opening through the mat layer of card stock.


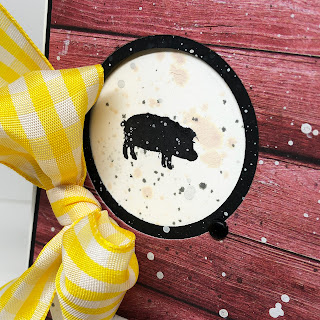
Here is a look at the sentiment and that fun rustic barn designer paper.  And I'll let you in on a secret:  I got a tiny smudge of black ink beside that little piggy so I decide to give everything a generous splattering of tea dye distress ink, black distress oxide ink, and diluted white acrylic paint.  I hope you'll think that it gave everything a fun, grungy barnyard kind of vibe with a side of sunshine.  


A sheet of designer paper from Craft Consortium's Over the Rainbow brings the cheerful yellow of the ribbon from the card front to the inside, a reminder of sunny skies and happy times when the stress of life has made them difficult to call to mind!       

Thursday, February 15, 2024

Preparing for Easter


Hello everyone!  I hope you had a happy Mardi Gras and a lovely Valentine's Day/Ash Wednesday!  Lent is here and Easter is definitely on its way!  ðŸŽ


Today's Stamp Simply project is a traditional sized card but with an off-center gate fold.  To make it I scored a 5.5 x 8.5 piece of card stock at 1.25 and 3 inches.  I adore cards like this that show off coordinating prints from a single pad of paper!    


The focus of the card front is our beautiful cross die embellished with pretty pastel Spring florals and rhinestones.  All of the images and sentiments here are from a single stamp set.  


On the inside there are some of our beautiful daffodils, one of my favorite flowers and also one of my favorites of all of our stamp sets.


This time I gave the flowers' centers a bolder color to bring some of the brighter colors from the Easter egg paper on the front into the inside.  I looked up photos of daffodils for examples...I had no idea they came in so many colors!

Supplies:

Remember, today (February 15, 2024) is the LAST DAY of our Valentine's Day sale!  Shop now for 14% off!

Thursday, February 8, 2024

Getting ready for Easter!


Hi everyone!  We're already into the second week of February and time is flying by!  Mardi Gras is almost here because Easter is early this year!    

It has been a while since I've made one of these "half-front" cards so I thought I'd try it with this darling Easter set!  It's such a cute set for making cards for kids, but adults will love it too.  


With the card closed it looks almost like a full card front with pretty papers, that adorable bunny for a focal image, a banner sentiment and a bright floral/ribbon embellishment.  


But when the card is opened the half-front design reveals the image and sentiment hidden inside.  All of the images and sentiments are from the same stamp set, our "Easter is for Jesus" stamp set and die bundle.  

To make the half front, I cut and scored a traditional portrait fold card base.  I used an additional 4.25 x 5.5 inch blank piece of card stock to die cut the bunny shape without passing the bottom of the die completely through the machine.  I carefully trimmed away the card stock to the left and right of the die cut.  

The depth of this piece helped to determine how much to cut away from the front of the card base to make the half-front.  I stamped the bunny onto another separate piece of card stock, colored and die cut it, and attached it to the half-front with mono multi glue.  That double-thickness helps lend more stability to the bunny and also keeps the Copic marker bleed-through from being visible from the inside.  A tiny slit in the fold allows the ribbon to pass through to the inside so that it doesn't have to be untied to open the card.  


Here's a closer look at the inside.  I love this simple, rustic cross alongside this profound message.  I hope that it gives you the "Easter Sunrise" vibe that I was going for!  

Supplies:

Thursday, February 1, 2024

Sunny Appreciation


Every once in a while I'll see something that inspires an idea, and I won't be able to shift gears until I've at least tried making it.  That is what happened with this card.  That umbrella paper is SO cute, and our new cloud dies seemed like a perfect mate to go along with the paper.  When I saw this fun fold on Pinterest I had to try putting it all together!  

The square focal point is made from a 6 x 6 piece of double-print paper scored 1.5 inches from all edges, with the corners snipped away.  Then a corner is folded back on each of the remaining flaps.  I used a couple of Tim Holtz dies to add a pull tab and arrow to draw attention to one of the flaps so the recipient will know there's more to see inside.


I found a cute sentiment to go with this theme from our Typewritten series.  The sunny yellow button and bow add to the fun, happy feeling.  


And here is a peek at the inside.  Circle and square dies finish it off with another sentiment from the same Typewritten series set.  

Do you have a friend who brings sunshine to your rainy days?  I hope so!  I'm so grateful for mine!

Supplies: